


Binding tutorial - the easiest way to join those ends
A friend showed me this method of joining the ends of binding strips earlier this year. It is so quick and easy. The only down side is that I wish someone had shown me 20 years ago!
Its a total game changer.
This tutorial focuses on measuring and joining the ends of your binding so that you have a perfect fit and smooth mitred join. I'm assuming you know how to prepare your strips and turn the corners etc.
Lets get stuck in.
1. Measure and trim
When stitching your binding to your quilt make sure you leave the ends loose. I like to leave about 8-10 inches looseat the begining, and if the binding gods are smiling on me, about 15 inches loose as I approach the join.
Stop stitching about 12 inches from the other end, leaving a gap.

Grab a scrap of fabric which is exactly the same width as your binding, which for me is 2.25", as I prefer a thin binding and mostly use low loft wadding. If you have plenty spare, the simplest thing is to cut some from the end of your binding, but I have used a different fabric so that it is easy to see what I am doing.
Lay the loose end you left at the start of your binding along the edge of the quilt, making sure it is sitting nice and flat. Then place your scrap across the end at a 90 degree angle, like this:

Make sure that the edges on the left hand side are straight.

Then take the other loose end and lay it over the top as shown above.
TIP: It is important to apply a tiny bit of tension to the end here as this step determines the final l length of the joined section. You want it to be slightly firm, not tight.
Cut the top binding end at a 90 degree angle exactly where it aligns with the right hand side of your scrap piece like this

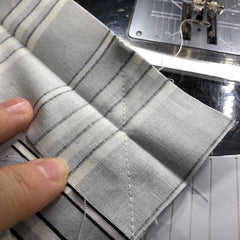
2. Stitch the mitre
Open out the fold and place the right sides together so that you form a right angle like this.

I like to pop a pin in to secure it as I move it under the machine.
Stitch diagonally across the two ends. You may find it helps to mark a line, but I don't worry as it is a pretty short seam. Sew from point to point.
Make sure you are stitching across the 'top' of your right angle by keeping the apex of the point to the right side of the machine like this.

Your stitching line should look like this:
3.Final trim and finish
Turn the binding right sides out and it will look like this.

Now you just need to trim the bulk, leaving a 1/4" seam allowance.


Finger press the seam open so you don't get a bump and voila! You have joined those ends and are ready to finish stitching your binding to your quilt without having to tear out a single hair ;-)
In case you are wondering about that fabulous stripe, it is from Washington Depot by Denyse Schmidt. You can grab some here:
Last of all I thought I should show you the quilt!
This my Kona cotton rainbow version of Denyse' Flowering Vine quilt - so using one of her fabrics seemed the perfect choice for my project. And I DO love a striped binding.

You can grab a copy of the pattern here
This sugar coated beast is a birthday present for a very dear, rainbow-loving friend. She's having a big one with a zero, so a big quilt was in order. I'm calling it 'The Happy Quilt' as the colours are just so cheerful.
Comments
Leave a comment